일/Spring2018. 5. 4. 16:36


fileName     = new String(fileName.getBytes("euc-kr"), "iso-8859-1");


System.out.println("latin1 -> euc=kr" + new String(viewFileName.getBytes("latin1") , "euc-kr")) ; 

System.out.println("utf-8 -> euc-kr        : " + new String(viewFileName.getBytes("utf-8"), "euc-kr"));

System.out.println("utf-8 -> ksc5601       : " + new String(viewFileName.getBytes("utf-8"), "ksc5601"));

System.out.println("utf-8 -> x-windows-949 : " + new String(viewFileName.getBytes("utf-8"), "x-windows-949"));

System.out.println("utf-8 -> iso-8859-1    : " + new String(viewFileName.getBytes("utf-8"), "iso-8859-1"));


System.out.println("iso-8859-1 -> euc-kr        : " + new String(viewFileName.getBytes("iso-8859-1"), "euc-kr"));

System.out.println("iso-8859-1 -> ksc5601       : " + new String(viewFileName.getBytes("iso-8859-1"), "ksc5601"));

System.out.println("iso-8859-1 -> x-windows-949 : " + new String(viewFileName.getBytes("iso-8859-1"), "x-windows-949"));

System.out.println("iso-8859-1 -> utf-8         : " + new String(viewFileName.getBytes("iso-8859-1"), "utf-8"));


System.out.println("euc-kr -> utf-8         : " + new String(viewFileName.getBytes("euc-kr"), "utf-8"));

System.out.println("euc-kr -> ksc5601       : " + new String(viewFileName.getBytes("euc-kr"), "ksc5601"));

System.out.println("euc-kr -> x-windows-949 : " + new String(viewFileName.getBytes("euc-kr"), "x-windows-949"));

System.out.println("euc-kr -> iso-8859-1    : " + new String(viewFileName.getBytes("euc-kr"), "iso-8859-1"));


System.out.println("ksc5601 -> euc-kr        : " + new String(viewFileName.getBytes("ksc5601"), "euc-kr"));

System.out.println("ksc5601 -> utf-8         : " + new String(viewFileName.getBytes("ksc5601"), "utf-8"));

System.out.println("ksc5601 -> x-windows-949 : " + new String(viewFileName.getBytes("ksc5601"), "x-windows-949"));

System.out.println("ksc5601 -> iso-8859-1    : " + new String(viewFileName.getBytes("ksc5601"), "iso-8859-1"));


System.out.println("x-windows-949 -> euc-kr     : " + new String(viewFileName.getBytes("x-windows-949"), "euc-kr"));

System.out.println("x-windows-949 -> utf-8      : " + new String(viewFileName.getBytes("x-windows-949"), "utf-8"));

System.out.println("x-windows-949 -> ksc5601    : " + new String(viewFileName.getBytes("x-windows-949"), "ksc5601"));

System.out.println("x-windows-949 -> iso-8859-1 : " + new String(viewFileName.getBytes("x-windows-949"), "iso-8859-1"));

Posted by JayCeeP
일/Spring2018. 5. 3. 13:50

웹 어플리케이션 개발에서 대용량 엑셀 다운로드는 항상 골칫거리이다.

한 10만 레코드 정도만 받으려고 해도

1) 일단 레코드를 얻어서 객체로 들고 있는 단계에서 OutOfMemory가 나기도 하고

2) 이걸 간신히 객체로 만든 후에 POI 나 JXL 라이브러리로 Workbook을 생성해 

    데이터를 채워나가다가 OutOfMemory가 나기도 한다. (같은 데이터가 중복되는 셈이니 2배가 되어)

3) 게다가 메모리에 담고 있는 걸 요청자에게 송신하는 시간동안 꼼짝없이 메모리를 잡고 있게 된다.


대용량 컨텐츠를 보낼 때는 조금씩 끊어 보내면서 flush를 할 수 있어야 하는데 이게 안되는 게 문제.


그래서 보통 다음과 같이 하나하나씩 해결해 나간다.

- 위의 3)번은 일단 파일로 저장하고 이 파일을 다운로드 시켜주는 방식이 가능하다.

- 위의 2)번의 경우 Workbook을 생성해 Row를 채우는 데 쓰인 객체는 해제시켜줄 수 있겠다.

- 아예 Workbook을 생성하지 않고 HTML 로 보내면서 Microsoft Excel 어플리케이션이 열 수 있게 

  응답헤더만 조정하는 방법도 있다.

- 내게 시키는 고객과 잘 협의가 가능하다면 CSV (Comma Separated Values) 포맷으로 다운로드도 

  가능할 것이다. 고객 만족도는 엄청 떨어지겠지만.


그런데 이것들을 제대로 해결해 주는 녀석이 등장.


Apache POI 3.8-beta3 (2011년 6월) 버전부터 임시파일을 활용하여 메모리 사용량을 최저로 유지하는 기능이 추가되었다.

(Excel 2007부터 지원되는 xslx, 혹은 ooxml 포맷만 가능)


확인을 위해 테스트 소스를 작성해 보았다.


pom.xml 을 다음과 같이 구성하여 apache-poi를 사용 가능하게 한다.


<project xmlns="http://maven.apache.org/POM/4.0.0" xmlns:xsi="http://www.w3.org/2001/XMLSchema-instance" xsi:schemaLocation="http://maven.apache.org/POM/4.0.0http://maven.apache.org/xsd/maven-4.0.0.xsd">

  <modelVersion>4.0.0</modelVersion>

  <groupId>test</groupId>

  <artifactId>test-poi-memory</artifactId>

  <version>0.0.1-SNAPSHOT</version>

  <name>test-poi-memory</name>

  <dependencies>

   <dependency>

   <groupId>org.apache.poi</groupId>

   <artifactId>poi-ooxml</artifactId>

   <version>3.10-beta2</version>

   </dependency>

  </dependencies>

</project>


다음과 같이 소스를 짜 보았다.


public class ExcelWriteTest {


    public static void main(String[] args) throws Exception{

        OutputStream os = new FileOutputStream("c:/tmp/excelfile.xlsx");


        // streaming workbook 생성

        Workbook wb = new SXSSFWorkbook(100); // 100 row마다 파일로 flush

        for(int sheetNum = 0; sheetNum < 6; sheetNum++){ // 시트 6개

            Sheet sh = wb.createSheet();

            Row heading = sh.createRow(1);

            String[] columns = new String[]{"ID", "NAME", "GENDER", "ADDR", "TEL"};


            for(int i = 0; i < columns.length; i++) {

                Cell cell = heading.createCell(i+1);

                cell.setCellValue(columns[i]);

            }


            for (int rowNum = 2; rowNum < 1048560; rowNum++){

                Row row = sh.createRow(rowNum);

                row.createCell(1).setCellValue("123123123123");

                row.createCell(2).setCellValue("JOHN_CORNER_MARIE_TYPE_PILE_END");

                row.createCell(3).setCellValue("MALE");

                row.createCell(4).setCellValue("Dongjin-Gu, Pyeonsoo-dong, Daeum-chon 2348-112");

                row.createCell(5).setCellValue("010-8422-9548");

            }

        }


        wb.write(os);

        os.close();

        ((SXSSFWorkbook)wb).dispose();

}


row의 내용들은 의미없이 양만 채운 것이고, 결과적으로 실행하고 나면 100메가 정도짜리 엑셀 파일이 만들어지게 조정했다.


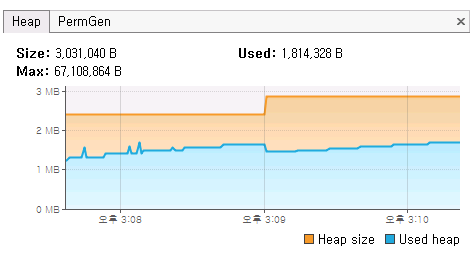
그걸 만드는 몇 분 동안 VisualVM 으로 메모리 사용량을 체크했는데 실행 내내 다음과 같이 2MB 안쪽으로 밖에 쓰지 않는다.


이걸 만들 때 주의할 것은, 시트(!)가 임시 저장소 (윈도우즈의 경우 환경변수 %TEMP% 로 정해진 위치, 유닉스라면 /tmp 일 듯) 에 압축되지 않은 채로 생기는데, 이게 꽤 양을 잡아먹는데다 위 코드의 마지막 줄 dispose() 를 실행하지 않으면 JVM이 종료된 후에도 파일이 사라지지 않는다.


그러므로 dispose()는 꼭 해 주는 걸 권장한다.

다만 dispose()를 하게 되면 그 Workbook 객체는 쓸 수 없는 상태가 되므로 가능한 한 마지막(!)에..


... 이제 이걸 가지고 다음과 같이 하면 다운로드가 끝난다.

1) 예제처럼 (임시)파일로 저장하고 dispose()한 후, 이를 다운로드 시키고 파일을 삭제한다.

2) 아예 workbook 객체를 가지고 다운로드까지 한 후 dispose() 한다.


위 방법 중 1)번은 개발구조 상 layer가 명시적으로 나누어져 있어 layer 간 건네줄 정보가 String(파일위치) 이라는 등 한정적이거나, 파일을 생성후 다운로드 하는 짧(지만 짧지 않)은 시간 동안 디스크 공간 점유가 염려될 때 사용할 수 있겠다. 2)번은 그런 제약이 없을 경우 쓸 수 있고.


둘 다 모듈로 일반화 시키려면 적절한 코딩은 필요하고.. 특히 예외사항 (파일 생성 중 오류가 난다거나 파일 생성과 관계없는 곳에서 오류가 날 경우 임시파일의 뒤처리 등등) 에 대한 대응이 잘 짜여 있어야 하겠다.


Posted by JayCeeP
일/office2018. 2. 23. 14:22

워드에서 문서구조로 편히 목차를 확인할려고


종종 다단계 번호매기기를 즐겨 쓴다.


근데 매번 양식 만들 때마다 한두개씩 기능이 가물가물해서 10~20분씩 삽질하니...


더이상은 귀찮다. 정리해 두자.


설명은 MS Office Word 2007 버전을 기준으로 한다.


1. 새문서 열기


2. 스타일 목록(1)을 활성화 시키고 새스타일(2)을 클릭


3-1. 스타일 목록에 표시될 이름(1)을 입력하고,

3-2. 스타일형식(2)은 '단락'으로 유지

3-3. 스타일기준(3)은 '제목1'로 변경

3-4. 다음 단락의 스타일(4)은 '표준'으로

3-5. 확인(5)을 누르고 '1순위제목'이라는 스타일을 완성

3-6. 3-1~3-6의 과정처럼 '2순위제목'과 '3순위제목'도 만든다. 스타일기준(3) 각각 다르니 유의.


4-1. 다시 새스타일을 클릭하고,

4-2. 이름(1)을 입력하고,

4-3. 스타일형식을 '목록'(2)으로 선택


5-1. 서식적용대상(1)을 '수준1'을 선택하고,

5-2. 글꼴들(2)을 조정한다.

5-3. 단계가 3단계였으니 나머지 '수준2'와 '수준3'도 서식적용대상(1)에서 선택하여 마찬가지로 글꼴을 조정.


6-1. 서식(1)을 클릭하고,

6-2. 번호매기기(2)를 선택.


7-1. 자세히(1)를 클릭하여 옵션목록을 확장.


8-1. 수준(1)에서 '수준1' 선택하고

8-2. 번호서식(2)을 조정해 준다.

8-3. 그리고 단계에 연결할 스타일(3)에 먼저 만들었던 '1순위제목'을 선택하여 연결

8-4. 8-1~8-3의 과정처럼 '수준2'에 '2순위제목'을, '수준3'에 '3순위제목'을 입력해준다.

8-5. 마지막으로 창 모두 확인(4)을 클릭하여 스타일을 저장.


9. 목록에서 생긴 스타일을 확인할 수 있다. 적용해서 사용하면 끝.


출처: http://damduc.tistory.com/290

Posted by JayCeeP
일/coding2018. 1. 20. 15:39

여태 개발을 하면서 습관적으로 반복문을 for문만을 사용했다. 알고리즘 공부하다보니 때로는 while을 사용하는 것이 소스 간결함에서 유리할 수 있다는 것을 알았다. 소스가 간결하다는 것은 해석하기도 좋다는 것이다. 이것을 비교하여 정리해본다.


 for

while 

사용법 

 for(반복 판단할 변수 초기화/일반적으로 int i=0;

      반복 조건(boolean 형태);

      반복 판단할 변수 처리/일반적으로 i++){

....


구문 처리

...

}

while(반복 여부 판단할 수 있는 boolean 형태/구문 내에 사용하는 변수나 조건으로 판단 할 수 있음){ 

....

구문 처리

또는

구문 처리+반복 여부 판단할 변수 처리

....

}

단순 반복문 구현 적합 

비교적 간단

비교적 귀찮음.

반복 여부 조건이 내용을 구현하면서 달라지는 경우를 고려하여 설계할 경우 for에 비하여 비교적 귀찮음. 또는 반복여부할 변수를 따로 관리해야하니 귀찮음 >> 개발자 자원(시간)이 소요됨.

알고리즘 구현 적합 

for()와 if()문, break문 사용 시 인자 내용 변경등을 고려해야 하기 때문에 소스의 양이 많아지고 가독성이 떨어질 수 있음.

break시점을 생각하지 않고 단순 구현만을 할 경우 필요이상으로 반복하여 퍼포먼스 차이 발생 가능.

비교적 간결

서로 비교한 결론 

단순 반복일 경우 for 문을 사용하는 것이 소스 해석이 더 편하다. 

for안에 if를 사용 && 특정부분에서 break 시키는 것을 원할 경우 while이 더 소스가 간결하다.


결론

-단순 반복문 사용 시 >> for문이 쓰기도 편하고 해석하기도 편하다.

-반복 조건이 유동적으로 변경되는 알고리즘 구현 >> for, if문 break를 사용할 경우 for문보다 while문이 더 간결하게 작성할 수 있다. 이런 경우에 for문 사용 시 반복 조건 및 내부에 여러 변수와 break처리가 쓰이므로 소스가 길어지고 이에 따라 해석이 더 어려워지는 경우가 발생한다.(절대적인 기준은 아님)

Posted by JayCeeP
일/Spring2018. 1. 11. 11:35


참고 포스트

  • 간단 구현 http://theeye.pe.kr/archives/1593
  • 상세 포스트 http://javacan.tistory.com/entry/133


공통 코드를 찾는 기준으로 캐시를 사용했을 때 기준.


-context-cache.xml


<?xml version="1.0" encoding="UTF-8"?>

<beans xmlns="http://www.springframework.org/schema/beans"

xmlns:xsi="http://www.w3.org/2001/XMLSchema-instance"

xmlns:cache="http://www.springframework.org/schema/cache"

xsi:schemaLocation="http://www.springframework.org/schema/beans http://www.springframework.org/schema/beans/spring-beans-4.0.xsd

http://www.springframework.org/schema/cache http://www.springframework.org/schema/cache/spring-cache-4.0.xsd">

<cache:annotation-driven key-generator="simpleKeyGenerator" />

<bean id="cacheManager" class="org.springframework.cache.ehcache.EhCacheCacheManager">

<property name="cacheManager" ref="ehcache" />

</bean>

<bean id="ehcache" class="org.springframework.cache.ehcache.EhCacheManagerFactoryBean">

<property name="configLocation" value="classpath:spring/ehcache.xml" />

<property name="shared" value="false" />

</bean>

<bean id="simpleKeyGenerator" class="org.springframework.cache.interceptor.SimpleKeyGenerator" />

</beans>


-ehcache.xml


<?xml version="1.0" encoding="UTF-8"?>

<ehcache>

<!--

name 캐시의 이름 필수

maxElementsInMemory 메모리에 저장될 수 있는 객체의 최대 개수 필수

eternal 이 값이 true이면 timeout 관련 설정은 무시되고, Element가 캐시에서 삭제되지 않는다. 필수

overflowToDisk 메모리에 저장된 객체 개수가 maxElementsInMemory에서 지정한 값에 다다를 경우 디스크에 오버플로우 되는 객체는 저장할 지의 여부를 지정한다. 필수

timeToIdleSeconds Element가 지정한 시간 동안 사용(조회)되지 않으면 캐시에서 제거된다. 이 값이 0인 경우 조회 관련 만료 시간을 지정하지 않는다. 기본값은 0이다. 선택

timeToLiveSeconds Element가 존재하는 시간. 이 시간이 지나면 캐시에서 제거된다. 이 시간이 0이면 만료 시간을 지정하지 않는다. 기본값은 0이다. 선택

diskPersistent VM이 재 가동할 때 디스크 저장소에 캐싱된 객체를 저장할지의 여부를 지정한다. 기본값은 false이다. 선택

diskExpiryThreadIntervalSeconds Disk Expiry 쓰레드의 수행 시간 간격을 초 단위로 지정한다. 기본값은 120 이다. 선택

memoryStoreEvictionPolicy 객체의 개수가 maxElementsInMemory에 도달했을 때,메모리에서 객체를 어떻게 제거할 지에 대한 정책을 지정한다. 기본값은 LRU이다. FIFO와 LFU도 지정할 수 있다. 선택

-->


<defaultCache

name="defaut"

maxElementsInMemory="100"

eternal="false"

overflowToDisk="false"

timeToIdleSeconds="300"

timeToLiveSeconds="600"

diskPersistent="false"

memoryStoreEvictionPolicy="FIFO"

/>


<!-- msgSvc  -->

<cache

name="msgCache"

maxElementsInMemory="1000"

eternal="false"

overflowToDisk="false"

timeToIdleSeconds="300"

timeToLiveSeconds="600"

diskPersistent="false"

memoryStoreEvictionPolicy="LRU"

/>

<!-- cmCdSvc,cmGrpCdSvc  -->

<cache

name="codeCache"

maxElementsInMemory="1000"

eternal="false"

overflowToDisk="false"

timeToIdleSeconds="300"

timeToLiveSeconds="600"

diskPersistent="false"

memoryStoreEvictionPolicy="LRU"

/>

</ehcache>


-java 구현 파일

*@Cacheable("codeCache") >> value나 cashNames로 설정 가능 @Cacheable(value="codeCache") or @Cacheable(cachNames="codeCache")

*@Cacheable(value="codeCache",key="c#mGrpCd") 형식으로 key를 지정할 수 있음. key를 지정하지 않으면 프레임워크에서 들어온 파라미터를 조합하여 키를 자체 생성하여 관리한다.


@Cacheable("codeCache")

public List searchCmCdList(String cmGrpCd) {

CmCdVo vo = new CmCdVo();

vo.setCmGrpCd(cmGrpCd);

return cboCmDao.selectList(CmCdDao.searchCmCdList, vo);

}

Posted by JayCeeP
일/Spring2018. 1. 11. 11:18

-서비스 명칭 별 트랜잭션 기준


동사 영문명

동사 한글명

* 트랜잭션

acquire

취득

O

adjust

조정

O

apply

적용

O

calcurate

계산

O

cancel

취소

O

certify

인증

O

change

변경

O

check

검사

X

create

생성

O

decide

판단

X

delay

지연

O

delete

삭제

O

delevery

출고

O

find

찾기

X

get

채번

X

handle

처리

O


inhouse

입고

O

isExist

존재

X

issue

발행

O

make

작성

O

manage

관리

O

regist

등록

O

request

요청

O

retrieve

조회

X

save

저장

O

search

검색

X

select

선택

X

send

발송

O

update

수정

O

wait

대기

O

process

처리

O


context-trasaction.xml 파일 내용


<?xml version="1.0" encoding="UTF-8"?>

<beans xmlns="http://www.springframework.org/schema/beans" xmlns:xsi="http://www.w3.org/2001/XMLSchema-instance"

xmlns:tx="http://www.springframework.org/schema/tx"

xmlns:aop="http://www.springframework.org/schema/aop"

xsi:schemaLocation="http://www.springframework.org/schema/beans http://www.springframework.org/schema/beans/spring-beans-4.0.xsd

    http://www.springframework.org/schema/tx http://www.springframework.org/schema/tx/spring-tx-4.0.xsd

    http://www.springframework.org/schema/aop http://www.springframework.org/schema/aop/spring-aop-4.0.xsd">


<bean id="txManager" class="org.springframework.jdbc.datasource.DataSourceTransactionManager">

<property name="dataSource" ref="dataSource"/>

</bean>


<tx:advice id="txAdvice" transaction-manager="txManager">

<tx:attributes>

<tx:method name="check*" read-only="true" propagation="SUPPORTS" timeout="60"/>

<tx:method name="decide*" read-only="true" propagation="SUPPORTS" timeout="60"/>

<tx:method name="find*" read-only="true" propagation="SUPPORTS" timeout="60"/>

<tx:method name="get*" read-only="true" propagation="SUPPORTS" timeout="60"/>

<tx:method name="isExist*" read-only="true" propagation="SUPPORTS" timeout="60"/>

<tx:method name="retrieve*" read-only="true" propagation="SUPPORTS" timeout="60"/>

<tx:method name="search*" read-only="true" propagation="SUPPORTS" timeout="60"/>

<tx:method name="select*" read-only="true" propagation="SUPPORTS" timeout="60"/>


<tx:method name="acquire*" rollback-for="Exception" propagation="REQUIRED" timeout="120"/>

<tx:method name="adjust*" rollback-for="Exception" propagation="REQUIRED" timeout="120"/>

<tx:method name="apply*" rollback-for="Exception" propagation="REQUIRED" timeout="120"/>

<tx:method name="calcurate*" rollback-for="Exception" propagation="REQUIRED" timeout="120"/>

<tx:method name="cancel*" rollback-for="Exception" propagation="REQUIRED" timeout="120"/>

<tx:method name="certify*" rollback-for="Exception" propagation="REQUIRED" timeout="120"/>

<tx:method name="change*" rollback-for="Exception" propagation="REQUIRED" timeout="120"/>

<tx:method name="create*" rollback-for="Exception" propagation="REQUIRED" timeout="120"/>

<tx:method name="delay*" rollback-for="Exception" propagation="REQUIRED" timeout="120"/>

<tx:method name="delete*" rollback-for="Exception" propagation="REQUIRED"  timeout="60"/>

<tx:method name="delevery*" rollback-for="Exception" propagation="REQUIRED" timeout="120"/>

<tx:method name="handle*" rollback-for="Exception" propagation="REQUIRED" timeout="120"/>

<tx:method name="inhouse*" rollback-for="Exception" propagation="REQUIRED" timeout="120"/>

<tx:method name="issue*" rollback-for="Exception" propagation="REQUIRED" timeout="120"/>

<tx:method name="make*" rollback-for="Exception" propagation="REQUIRED" timeout="120"/>

<tx:method name="manage*" rollback-for="Exception" propagation="REQUIRED" timeout="120"/>

<tx:method name="regist*" rollback-for="Exception" propagation="REQUIRED" timeout="120"/>

<tx:method name="request*" rollback-for="Exception" propagation="REQUIRED" timeout="120"/>

<tx:method name="save*" rollback-for="Exception" propagation="REQUIRED" timeout="120"/>

<tx:method name="send*" rollback-for="Exception" propagation="REQUIRED" timeout="120"/>

<tx:method name="update*" rollback-for="Exception" propagation="REQUIRED" timeout="120"/>

<tx:method name="wait*" rollback-for="Exception" propagation="REQUIRED" timeout="120"/>

<tx:method name="process*" rollback-for="Exception" propagation="REQUIRED" timeout="120"/>

<tx:method name="new*" rollback-for="Exception" propagation="REQUIRES_NEW" timeout="120"/>

<tx:method name="push*" rollback-for="Exception" propagation="REQUIRES_NEW" timeout="120"/>


<!-- Long term transaction -->

<tx:method name="long*" rollback-for="Exception" propagation="REQUIRED" timeout="120"/>

</tx:attributes>

</tx:advice>


<aop:config>

<aop:pointcut id="requiredTx" expression="execution(public * com.프로젝트경로..svc.*Impl.*(..)) || execution(public * com.프로젝트경로.*Impl.*(..))"/>

<aop:advisor advice-ref="txAdvice" pointcut-ref="requiredTx" />

</aop:config>


</beans>


Posted by JayCeeP
일/Spring2018. 1. 11. 11:08

-JUnit 관련 문서 즐겨찾기

  • assert 레퍼런스:http://junit.sourceforge.net/javadoc/org/junit/Assert.html

  • junit + mysql 초기세팅:http://all-record.tistory.com/175

  • 롤백설정:http://credemol.blogspot.kr/2011/01/spring-junit-transaction.html


-프로젝트에 로컬 서버 구동만 되어있을 때 JUnit 세팅하기.

  1. 테스트 파일 생성할 Src/test/java/com/프로젝트명/이하 경로 생성
  2. 프로젝트 오른쪽 클릭 > properties
  3. Java Build Path에서 Add Folder 하여 p프로젝트명/src/test/java 선택
  4. 하단 output folder 프로젝트명/target/test-classes 입력
  5. 테스트할 파일 junitTest.java 생성


    package com.프로젝트명.이하경로;


    import static org.junit.Assert.*;

    import org.junit.BeforeClass;

    import org.junit.Test;

    import org.junit.runner.RunWith;

    import org.springframework.beans.factory.annotation.Autowired;

    import org.springframework.test.context.ActiveProfiles;

    import org.springframework.test.context.ContextConfiguration;

    import org.springframework.test.context.junit4.SpringJUnit4ClassRunner;

    import org.springframework.test.context.web.WebAppConfiguration;


    ....

    테스트할 서비스 관련 import 부분

    .... 


    @RunWith(SpringJUnit4ClassRunner.class)

    @ContextConfiguration(locations="file:src/main/resources/spring/context-*.xml")

    //@ActiveProfiles("pc") >> 이건 프로젝트마다 환경이 다르므로 환경에 맞게 세팅한다

    @WebAppConfiguration

    public class junitTest {


    @Autowired

    CboCmDao cboCmDao;


    @BeforeClass

    public static void setServerMode() throws Exception {//이 메쏘드에서 테스트 전에 세팅이나 실행되어야할 서버 및 스프링 환경 설정을 해준다.

    //System.setProperty("server.mode", "pc");>>이건 프로젝트마다 환경이 다르므로 환경에 맞게 세팅한다

    }


    @Test

    public void test() throws Exception{

    UsrToVo usrVo = cboCmDao.selectOne(LoginDao.selectUsr, "아이디");


    assertEquals("내이름",usrVo.getUsrNm());

    }

    }

  1. 위에서 만든 자바파일 오른쪽 클릭 > run as > junit 선택
  2. 실행하여 db연결 되는지 확인
  3. 위에 붉은 글씨 부분을 수정하여 테스트할 서비스로 변경해주면


Posted by JayCeeP
일/database2017. 8. 11. 15:30

마리아DB 최신 버젼에서는 계층구조 조회 기능을 지원한다고하나, 일단 지금 쓰고있는 마리아DB는 구버젼이어서 function으로 구현해야한다.


계층 조회가 필요한 테이블 마다 function을 구현해야하고 구현 방법 또한 명쾌하진 않아 특히 오라클 환경의 개발자라면 더욱 짜증나는 일이다.


이 펑션을 및 수행 과정을 히해하려면 실행되는 순서에 대해 완벽하게 알고있어야하는 불편함이 있다.


구현방법

-펑션 생성

-조회할 쿼리에서 id ,rownul, level 등 각 전역 변수 설정 후 펑션 호출


계층 구조 펑션 로직 설명

-조인걸린 테이블만큼 계층구조 조회 펑션을 반복(재귀)호출 한다

-펑션 내에서 loop를 돌리는데 하위부서가 있으면 하위부서의 id를 리턴하고 depth를 1더한다. 여기서 설정되는 depth, sort_order는 전역 변수에 대입하여 반복한다.

-하위부서가 없으면 이전 상위 depth로 돌아가고, 이 상황에서 하위 부서 중 다음 sort_order 의 조직이 있는지 검사 후 있으면 id리턴하고 1더한다.

-loop가 끝나면 계속 상위 @start_with까지 depth가 타고 올라갈 것이고 여기서 null이 반복 리턴 된다.


제약사항

-mysql 전역변수(현재 사용자 세션에 한하는 전역변수임)를 이용해서 재귀 호출을 한다.

-여러개의 key로 조회가 불가능하다. 즉 조회하려는 group_id가 여러개 일경우 추가적인 커스터마이징이 필요함.

-여러 테이블에 쓴다면 각각 테이블에 맞는 function을 만들어야하는 불편함.

-조인걸리는 레코드 개수만큼 재귀 실행이 되므로, 개수에 대한 보장이 필요하며, 레코드보다 실행회수가 많아지면 null 리턴을 하게 되는데 성능이 느려질 수 있으므로 최대한 조건에 맞는 레코드 개수가 조회되도록 조건을 걸어줘야한다. 레코드 내용은 상관없음. 아래 쿼리에서는 company_id를 where 조건으로 만들어놓았다. >> 빨간 글씨 처리한 부분


원본 테이블 데이터

company_id    parent_group_id    group_id    sort_order

-----------------------------------------------------------

C1                                         G0            000

C1                G0                      G01          001

C1                G0                      G02          002

C1                G01                    G011         003

C1                G01                    G011         004

C1                G02                    G021         005

C2                                         T1             006                         


조회 xml

SELECT GROUP_ID, level, rownum FROM 

(

SELECT 

fncChildGroups() AS GROUP_ID, 

@level as level, 

@rownum as rownum 

FROM (

SELECT 

@start_with := G_H2.group_id, 

      @id := @start_with, 

          @level := 0, 

          @rownum := 0, 

          @sort_order := -1,

          @portal_id := #company_id#

    ) G_H1,

     group G_H2

 WHERE G_H2.company_id = #company_id#

) G_H3

WHERE GROUP_ID IS NOT NULL


function 생성 스크립트(maria db)


DELIMITER $$


DROP FUNCTION IF EXISTS `fncChildGroups` $$


CREATE DEFINER=`생성할 DB명`@`%` FUNCTION `fncChildGroups`()

RETURNS varchar(27) CHARSET utf8

LANGUAGE SQL

NOT DETERMINISTIC

CONTAINS SQL

SQL SECURITY DEFINER

COMMENT ''

BEGIN

DECLARE _group_id varchar(27) default '';

DECLARE _parent_group_id varchar(27);

DECLARE CONTINUE HANDLER FOR NOT FOUND SET @id = NULL;

SET _parent_group_id = @id;

set @rownum := @rownum + 1;

#실제로 group_id가 null이거나 loop가 끝나고 @start_with까지 타고간(depth가 -1인 상황) 상태에서는 null 리턴.

IF @id IS NULL THEN

   RETURN NULL;

END IF;

if @level = 0 then

set @level := 1;

return @id;

end if;

LOOP

#sort_order 정렬하여 하위 depth 중 다음 sort_order의 조직을 선택

SELECT group_id, sort_order INTO @id, @sort_order

FROM tbl_group

WHERE parent_group_id = _parent_group_id and sort_order > @sort_order

order by sort_order

limit 1;

#하위 부서가 있는 경우 > 현재 group_id 리턴하고 depth에 1 더함

IF @id IS NOT NULL OR _parent_group_id = @start_with THEN

SET @level = @level + 1;

RETURN @id;

END IF;

#@하위 부서가 없는 경우 > depth 1을  뺀다.

SET @level := @level - 1;

SELECT group_id, parent_group_id, sort_order INTO _group_id, _parent_group_id, @sort_order

        FROM tbl_group

        WHERE group_id = _parent_group_id;

END LOOP;

END;

$$


DELIMITER ;

Posted by JayCeeP
일/Spring2017. 4. 27. 14:43
1
2
3
<plugins>
    <plugin interceptor="com.tistory.stove99.UpdateInterceptor"/>
</plugins>


출처: http://stove99.tistory.com/34 [스토브 훌로구]


1
2
3
4
5
6
7
8
9
10
11
12
13
14
15
16
17
18
19
20
21
22
23
24
25
26
27
28
29
30
31
32
33
34
35
36
37
38
39
40
41
42
package com.tistory.stove99;
 
import java.sql.Statement;
import java.util.Properties;
 
import org.apache.ibatis.executor.statement.StatementHandler;
import org.apache.ibatis.plugin.Interceptor;
import org.apache.ibatis.plugin.Intercepts;
import org.apache.ibatis.plugin.Invocation;
import org.apache.ibatis.plugin.Plugin;
import org.apache.ibatis.plugin.Signature;
 
@Intercepts({@Signature(type=StatementHandler.class, method="update", args={Statement.class})})
public class UpdateInterceptor implements Interceptor{
     
    @Override
    public Object intercept(Invocation invocation) throws Throwable {
        StatementHandler handler = (StatementHandler)invocation.getTarget();
         
        // 쿼리
        String sql = handler.getBoundSql().getSql();
         
        // 쿼리실행시 맵핑되는 파라메터들
        String param = handler.getParameterHandler().getParameterObject()!=null ?
                             handler.getParameterHandler().getParameterObject().toString() : "";
         
        // DB에다 로그 insert
        /////////////////
        ////////////////
         
        return invocation.proceed();
    }
 
    @Override
    public Object plugin(Object target) {
        return Plugin.wrap(target, this);
    }
 
    @Override
    public void setProperties(Properties properties) {
    }
}


출처: http://stove99.tistory.com/34 [스토브 훌로구]

' > Spring' 카테고리의 다른 글

자바 인코딩 테스트 코드  (0) 2018.05.04
대용량 엑셀 다운로드  (0) 2018.05.03
ehcache 캐시 설정  (0) 2018.01.11
스프링 트랜젝션 (transaction context) 설정  (0) 2018.01.11
JUnit 세팅 방법 및 참고 포스트  (0) 2018.01.11
Posted by JayCeeP